

Imagine this: It's the middle of the school year. You're reviewing a hard subject and you kids are struggling. A test is coming up and it's time to give a review before you give that big test. What are you going to do to review that's fun and engaging. Kids love Jeopardy games, but how do I find the right one, especially for the content I teach?
I've run into this problem many, many times. I think every teacher should know, at least, the basic skills needed to make a jeopardy powerpoint game. Take that old test and make a review game out of it.

Here's how to create a 3 category Jeopardy game in 7 easy steps.
1.) Figure out the questions.
If you're familiar with Microsoft Word, the Microsoft Powerpoint is very similar. To start making a powerpoint game, think about the questions you want included. Write them down on paper or in a notebook. I write my problems in a "Teacher Journal" I bought from the Dollar Tree. It's so much easy to have them already figured out when you're inputting them.

2.) Title Screen and Rules
Start working on the powerpoint! You can make a slide for the title and rules if you like. Just about everyone knows what Jeopardy is so a rules page might not be necessary. I'll make a simple Addition Game. Dress it up by changing fonts types and the color.


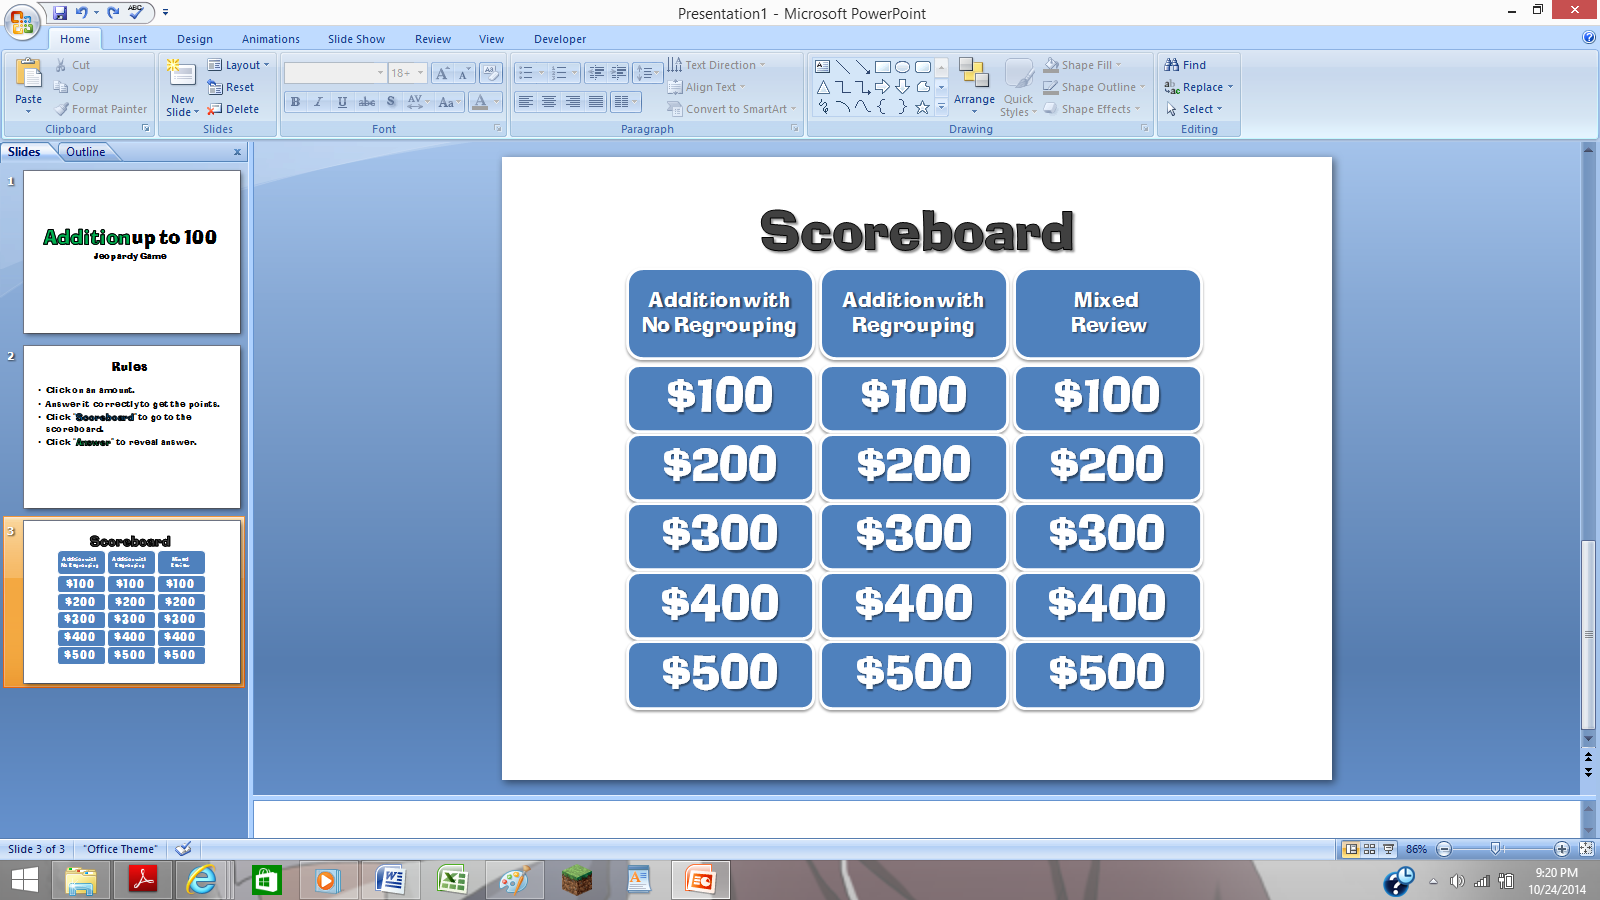
2.) Scoreboard
Here's the hard part. The scoreboard may very well be the hardest part. I think it's pretty easy after doing it a few times. I used shapes for my boxes. Go to Insert>Shapes> Rounded Square. Input 6 of them.
Type in the appropriate text (ex. Category title, $100, $200, $300, $400, $500). Adjust the size, color, and font as you see fit.

Copy and Paste works wonders! Select all the boxes by dragging your mouse. Right click "copy" and "paste". Move them as you like.
3.) Question Board
Now comes one of two hard parts: the question slide! This the part most teachers dread. But alas, if you have the questions already made, it can be a breeze! I suggest you start by creating just one slide and duplicating it. If you like, you can create all the slides you need (no answer slides in this tutorial). Add the title and the amount it is worth up to $500 (5 slides in all).

Again, the joys of Copy and Paste. You can select the 5 slides you created, copy and paste them twice. Change the names of the categories. Now add your questions! Create 2 text boxes: one for the question and one for the answer. Also, create 2 shape buttons named "Answer" and "Scoreboard".

The second hardest part. Hyperlinking allows you to click on a certain part of the powerpoint and it will take you somewhere else. This can be another slide, a website, or even to another document. In this case, we will hyperlink to another slide.
Start by right clicking on the "scoreboard" button and click hyperlink.
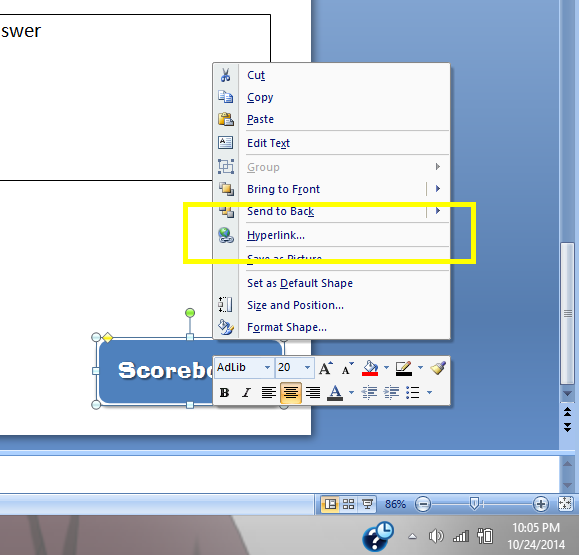
A Box like this should appear. Next, click on "Place in the Document." Find the "scoreboard" slide and select it. A picture of the slide should appear (red box). Click ok. You can test it out by going into slideshow mode and clicking on "Scoreboard"

If you are successful, repeat the same process for you scoreboard. Link each amount to its corresponding slide.
5.) Answer Animation
With the hard parts out of the way, the last thing to do it make the answers appear. Start by clicking "Animations" and "Custom Animations. A "Custom Animation" box should appear on the right side of your screen. Next, click on the answer to the question (not the answer button like the scoreboard button), click "Add Effect", and choose and "Entrance" effect such as appear, blinds, or box.
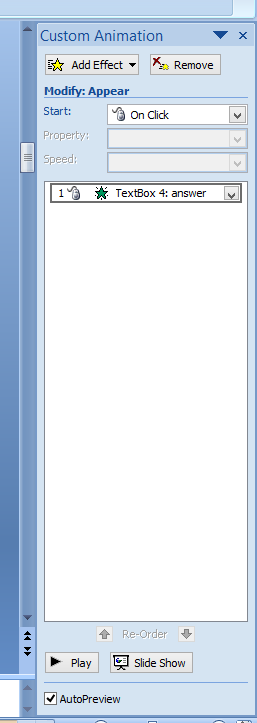

It will automatically show you a preview. Choose your favorites. Last, we need to make the answer appear when you click on the "Answer" button. Click on the small down arrow on the Custom Animation box and click on Timing. once there, click on "Trigger">Start Effect on click of"> Answer Button (whatever shape you chose).

6.) Disappearing Amounts
Lastly, let's make those amounts you click on disappear after you click on them. Repeat the above step. Click on the amount, choose a custom animation, only chose "Exit" instead of "Entrance". Change the trigger to the amount. Repeat the process for all the amounts. Test the animations by going into "Slideshow"

7.) Dress it Up
If all the hyperlinks and animations work, you can now customize it yourself! Create a background ground or add some clip art! Even add a "Double Jeopardy" or "Final Jeopardy" questions. Add some music or sound effects. Here are some backgrounds to get you started.
Don't have time to make one? You can purchase editable powerpoint game templates! Each template comes with a powerpoint with all the links and buttons ready to go! All you have to do is add the questions and clip art!
I hope you've enjoyed this tutorial. Subscribe via email or bloglovin' for more powerpoint tutorials, tips, and tricks. Check out my TPT Store for awesome Jeopardy games and other games too.
Thanks for sharing this post! I always wanted to know how to create my own jeopardy game using ppt instead of constantly buying them!
ReplyDeleteA LoveLi Class
Thank you so much for giving step-by-step directions on how to create this jeopardy game. I also love turning anything we are studying into a game for my first graders. I have created Jeopardy-style games before, but your tutorial presents a MUCH easier way of doing it lol! And the nice thing is that once you create your first game, you can just go back in and change the questions and answers.
ReplyDeleteJasmine
Buzzing With Mrs. McClain