28 October 2014

Creating the Ultimate TPT Planner!


Making products can be a lot of work. Balancing home and making products is even more work. I give kudos to the teacher that work at school, create products in their free, and manage the house. Brownie points all around. TPT is my full time job at the moment so between creating games and watching my niece and nephew can be a little frustrating a times. That's why I created this:


I had created a smaller version of this at the beginning of the school year that I kept up with, but finally decided get one made professionally. I spent about 2 weeks creating all the pages I may need for the entire school year (August to July). Check out each of the pages included and find out how you can score your own!
 
 
The cover is a clear plastic covering over a regular cover sheet I made..  Pretty nice. The binding is a black plastic coil. I had this made at Office Depot and they had other bindings as well. I figured if I'm going to opening and closing it all the time, a coil would best be suited. There are other bindings like the combs, stapled, and taped. 

 
On the inside cover, I created an information sheet with my basic information (name, address, phone, websites, etc).  Next page has the table of contents. My planner contains 160 pages, mostly do to weekly planning sheets.


 A close up of the table of contents.


Each of the title pages are in color and the rest of the pages are in black and white. I included clips from EduClips and Ashley Hughes.


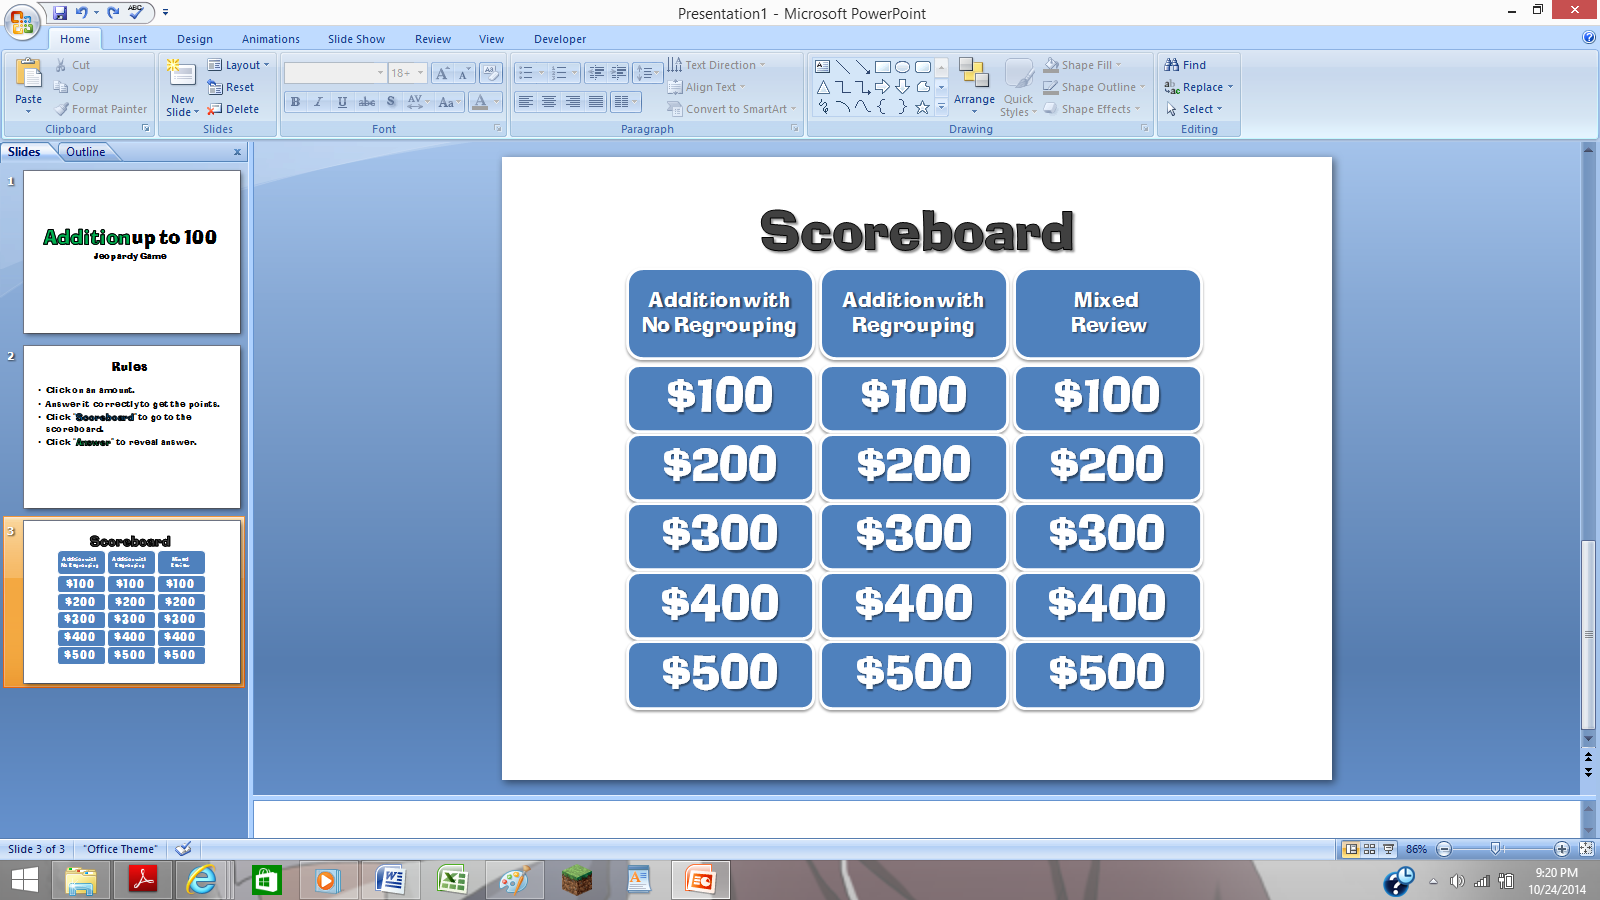
I keep track if every game I make and place it in my Powerpoint Games Section. This is a way for me to check back on games I may have already created or to give me another topic to cover. 


Every Saturday I plan for the following week. I decide what games I should/will work on, depending on the dates and any upcoming holidays. My planner includes a two page spread of each month, a monthly Blog Topic planner, and 5 weekly product planner sheet for each week in that month.


My WeekIy Product Planner has a space for each day of the week (excluding weekends) and a Project space for my to list what projects I will work on. I also have a space for if the product is completed. I also have two areas at the bottoms for my Blog Topics for that week to write/post and what theme to post on my Facebook page (such as giveaways, blog hops, themed/holiday products, etc). 
 
 
The next section is my Bundles section. Here I list all the bundles I have created or will create. There are several pages of these because this is a yearly planner. It is broken up in to Math, Seasonal, and Holiday Bundles.


Lastly, there's the Miscellaneous section which includes a Weekly To-Do List, my "What To Do After Posting" list, "Monthly Giveaway Log", and Notes section (To be used hopefully for the TPT Conference).


Did you know that any donation of your products can be a write off in your taxes? Who knew, right?


These are taking notes whenever I need them. I plan to use them when I go to the TPT Conference in July.
 
The last pages include my terms of use and a regency black cover (the same you see with most store back covers). I used free fonts I found online and clip art from Zip-A-Dee-Doo-Dah, EduClips, Whimsy Clips, and Ashley Hughes.
 
I made this online at Office Max/Office Depot. You can upload your file and create your own personal planner. You can choose everything, from the covers to the binding to which pages are in color or black and white. Overall, this cost my $32. Luckily, when I purchased this when there was 50% off sale so it cost me $16 for 160 pages (+ $10 shipping). It took a week to be created and shipped (I made it Thursday and received it Wednesday). My Office didn't have Site-to-Store, but if it, My planner would be all in color.
 
Let me know if you have any questions about my planner. I'd be happy to answer them! Here's a link to Office Max/Office Depot:http://www.officedepot.com/a/design-print-and-ship/


Class Dismissed!
 

25 October 2014

Learn Make a Simple Powerpoint Game in 7 easy Steps!


Imagine this: It's the middle of the school year. You're reviewing a hard subject and you kids are struggling. A test is coming up and it's time to give a review before you give that big test. What are you going to do to review that's fun and engaging. Kids love Jeopardy games, but how do I find the right one, especially for the content I teach? 


I've run into this problem many, many times. I think every teacher should know, at least, the basic skills needed to make a jeopardy powerpoint game. Take that old test and make a review game out of it.


Here's how to create a 3 category Jeopardy game in 7 easy steps.

1.) Figure out the questions.

If you're familiar with Microsoft Word, the Microsoft Powerpoint is very similar. To start making a powerpoint game, think about the questions you want included. Write them down on paper or in a notebook. I write my problems in a "Teacher Journal" I bought from the Dollar Tree. It's so much easy to have them already figured out when you're inputting them.


2.) Title Screen and Rules

Start working on the powerpoint! You can make  a slide for the title and rules if you like. Just about everyone knows what Jeopardy is so a rules page might not be necessary. I'll make a simple Addition Game. Dress it up by changing fonts types and the color.


2.) Scoreboard

Here's the hard part. The scoreboard may very well be the hardest part. I think it's pretty easy after doing it a few times. I used shapes for my boxes. Go to Insert>Shapes> Rounded Square. Input 6 of them.

Type in the appropriate text (ex. Category title, $100, $200, $300, $400, $500). Adjust the size, color, and font as you see fit.


Copy and Paste works wonders! Select all the boxes by dragging your mouse. Right click "copy" and "paste". Move them as you like.


3.) Question Board
Now comes one of two hard parts: the question slide! This the part most teachers dread. But alas, if you have the questions already made, it can be a breeze! I suggest you start by creating just one slide and duplicating it. If you like, you can create all the slides you need (no answer slides in this tutorial).  Add the title and the amount it is worth up to $500 (5 slides in all).


Again, the joys of Copy and Paste. You can select the 5 slides you created, copy and paste them twice. Change the names of the categories. Now add your questions! Create 2 text boxes: one for the question and one for the answer. Also, create 2 shape buttons named "Answer" and "Scoreboard".


4.) Hyperlinking the scoreboard and questions
The second hardest part. Hyperlinking allows you to click on a certain part of the powerpoint and it will take you somewhere else. This can be another slide, a website, or even to another document. In this case, we will hyperlink to another slide.

Start by right clicking on the "scoreboard" button and click hyperlink.


A Box like this should appear. Next, click on "Place in the Document." Find the "scoreboard" slide and select it. A picture of the slide should appear (red box). Click ok. You can test it out by going into slideshow mode and clicking on "Scoreboard"


If you are successful, repeat the same process for you scoreboard. Link each amount to its corresponding slide.


5.) Answer Animation
With the hard parts out of the way, the last thing to do it make the answers appear. Start by clicking "Animations" and "Custom Animations.  A "Custom Animation" box should appear on the right side of your screen. Next, click on the answer to the question (not the answer button like the scoreboard button), click "Add Effect", and choose and "Entrance" effect such as appear, blinds, or box.


 It will automatically show you a preview. Choose your favorites. Last, we need to make the answer appear when you click on the "Answer" button. Click on the small down arrow on the Custom Animation box and click on Timing. once there, click on "Trigger">Start Effect on click of"> Answer Button (whatever shape you chose).


6.) Disappearing Amounts
Lastly, let's make those amounts you click on disappear after you click on them. Repeat the above step. Click on the amount, choose a custom animation, only chose "Exit" instead of "Entrance". Change the trigger to the amount. Repeat the process for all the amounts. Test the animations by going into "Slideshow"


7.) Dress it Up
If all the hyperlinks and animations work, you can now customize it yourself! Create a background ground or add some clip art! Even add a "Double Jeopardy" or "Final Jeopardy" questions. Add some music or sound effects.  Here are some backgrounds to get you started.

Don't have time to make one? You can purchase editable powerpoint game templates! Each template comes with a powerpoint with all the links and buttons ready to go! All you have to do is add the questions and clip art!


I hope you've enjoyed this tutorial. Subscribe via email or bloglovin' for more powerpoint tutorials, tips, and tricks. Check out my TPT Store for awesome Jeopardy games and other games too.

23 October 2014

One Thing You Didn't Know About Me: I was a Band Geek!


Here's something you didn't know about me:


I didn't play an instrument in high school, but I was part of the colorguard. It was fun and I made so many friends. We did shows at football games, and competitions or parades on Saturdays.


Band Show" Tragedy, Remembrance, and Triumph: A Tribute to 9/11"
 
Band Show: The Bee Gee's
Band Show: Pinball Wizard
Winterguard Show: No name really. Just performing to "Overture to Candide"
 
 I was on both the colorguard and winterguard team. I was Captain my junior year. My favorite years would have to be my sophomore year (Pink Colorguard Outfits) and my senior year (not pictured). That year we did the Bee Gee so our music was "You Should Be Dancing" , "Jive Talk", Immortality", and of course, "Stayin' Alive." The entire band even disco danced. That same year we did winterguard for the first time, which is just colorguard performing to music. We performed to "1000 Miles" by Vanessa Carlton. We ended up with 3 place at the State Competition. My senior year, we did Finding Neverland and we were dressed in green like Tinker Bell! I still have every colorguard/winterguard outfit too!
 
Were you a band geek? What instrument did you play? What kind of shows did your band do? Comment below!
 
Class Dismissed!


21 October 2014

TpT Tips: What to Do After Posting a Product


Here are some more tips for TpT Beginners. Have you ever finished a product and posted it? Ever thought if there was anything else you could do before moving on to the next product? Here are 7 Things you can do after you've posted a product.


1.) Schedule a facebook post.

After posting your new product(s) on TPT, it's time to start advertising! One of the best places to start is Facebook. If you haven't set up a facebook page for your store, do so. Post your product, giving a small description to viewers. Offer it half price to really catch them. Use the original picture of your product (the same cover picture you used on TPT). The bigger, the better and don't forget the link. If you want, you can schedule the product to posted at a later date by clicking on the clock on the bottom left hand corner on your post. You can set it up as later as 5 minutes or 5 days from now.

2.) Have a Flash Freebie or Giveaway

Make your product as a flash freebie is a great way for buyers  look at your product and get instant feedback. Flash Freebies can last anywhere from a few minutes to one day. Having a giveaway is also great too. It exposes your page to other viewers, especially if they share it or tag a friend.
 
3.) Pin it to Pinterest
 
Pin your product! Pinterest is free advertising for your product! Pin it to as many boards as you can! The more you pin it the more exposed your product becomes. Create a nice picture of your product that you upload from your computer.  They look much better than if you pin it using the pin button from the product page. Try using large pictures or real-life pictures of your product in use.
 
4.) Back Up your Product
 
I  can't tell you how many times my products have jumped from one computer to another. Make sure your completed item is backed up and in a safe location. I recommend Dropbox because you can continue to work on it and it will automatically save to the web. You can also access it via the website from any computer. Other sites like Google Drive, SkyDrive, and MediaFire are great too.
 
5.) Add it to a "List of Inventory"
 
I keep track of every powerpoint game I make. Keeping a record of products helps me to keep track of the many games I have made. It gives me a reference. A place to go to when I need to know if I have made that particular product before. I keep a simple list of the item number, post date, and the product name. TPT also keeps a list of your products, but it nice to have a hands-on list whenever my computer or cellphone is unavailable and an idea comes to mind. I keep this list in a planner I created and use on a daily basis.
 
6.) Blog about it!
 
If you have a blog, write about it! Show buyers it works! The more pictures, the better. Showcase how it works and explain how it can be better for a teacher classroom. Whenever I am excited about a new product, I blog about it. When I created my first game that was not Math (All About Plants), I was estatic! It was the first game I had made since starting TpT that wasn't a math game. I blogged about it. I continued to blog about new games that I think are awesome!

7.) Promote it on Social Media!

This is a given! I've already mention Facebook, Pinterest, and Blogs, but there's so much more!! Tweet it! Instagram it! Add it to a Linky Party! Use the Seller's Forum on TPT to promote it! Youtube it! Podcast it! Everyone has at least one of the social media sites I mentioned so why not put them to good use?


There are so many ways to get your products out there. Doing these things will surely increase sales and expose your store to others. I've included a mini poster with these steps to help you out in both color and black & white. Enjoy!


Get this poster by clicking here:


Class Dismissed!


18 October 2014

Buy 2 Get One Free Sale


I'm throwing a Buy 2 Get 1 Free Sale this weekend! Just one of the few ways I'd like to say "Thank You" to all my followers, New and Old!


The details are pretty clear. Simply purchase 2 items from my store. Then, email me with subject "BOGO" telling me your buyer name, what 2 items you purchased, and what free item you would like. Only 2 stipulations:
 
1.) They have to be the same item type (2 games then 1 free game, 2 worksheets then 1 free worksheet, etc). This goes for all my products (bundles, seasonal packs, ppt games, worksheets, puzzles, teacher forms, etc)
 
2.) Lowest priced item is free. (Ex. Buy $3 worksheet, $2 worksheet, then get a free $2 or less worksheet.
 
This will give you a chance to get that extra item you want but don't have enough to get it. This sale for SATURDAY AND SUNDAY ONLY. The next time I have a BOGO may be next year!
 
Still unclear? Download the full details here.


10 October 2014

Halloween Bash Blog Hop


I'm so excited for the Halloween Bash Blog Hop! This is my first Blog Hop so please, be kind! =D.


Halloween has always been a favorite holiday of mine. My favorite costume what when I was Miss Singletree Ct. Instead of being Miss America or Miss USA, my mom decided that I could be the beauty queen of my neighborhood (which was called "singletree ct.") My mother made a custom sash for me and she did my hair up real nice. Of course, I had a very pretty silver tiara with "diamonds" and my flowers.  I got to dress in my favorite outfit which was a red plaid dress. Now that I think about it, that dress was awful, but back then, I felt just like Miss Universe. =D


Another great thing about the fall is pumpkins. They are everywhere!! I love to bake so I'm always trying to make new things. Last year, I bake a made-from-scratch apple pie and it was AWESOME! Since Fall started, my family keeps asking me to make it again and I will. This year, I want to make this yummy pumpkin cheesecake. I've baked  cheesecake-from-scratch with my grandmother so this recipe should be easy and tasty!


Prep Time: 1 hour, 30 minutes
Total Time: 1 hour, 30 minutes
Yield: 10 servings (using a 9-ounce clear plastic cup for serving)
 

No-Bake Mini Pumpkin Cheesecakes

Ingredients

    For the crust
  • 1 sleeve graham crackers (about 9 crackers)
  • ½ stick (4 tablespoons) butter, melted
  • 2 tablespoons sugar
  • 2 tablespoons brown sugar
  • For the filling
  • 1 8-ounce package cream cheese, softened to room temperature
  • 1 15-ounce can pumpkin puree
  • 3 teaspoons pumpkin pie spice
  • 1 1-ounce package sugar free cheesecake-flavored instant pudding mix (or 1/3 of a non-sugar free instant pudding may be used)
  • 1 14-ounce can sweetened condensed milk
  • 1 12-ounce container frozen whipped topping, plus extra for garnish if desired

Instructions

  1. Place the graham crackers in the bowl of a food processor and pulse the crackers into fine crumbs. Add the melted butter, sugar and brown sugar and pulse until combined.
  2. Spoon the crumbs into individual 9-ounce plastic cups (or other individual sized cups for serving). Place in the refrigerator to set while you are preparing the filling.
  3. In the bowl of a stand mixer with the paddle attachment, beat the cream cheese until light and creamy.
  4. Add the pumpkin, pumpkin pie spice, and pudding mix and beat until completely mixed, scraping down the sides and bottom of the bowl to ensure that all ingredients are well combined.
  5. Add the sweetened condensed milk and mix again until well combined.
  6. Change your stand mixture attachment to the wire whisk. On slow speed, fold in the tub of Cool Whip until well combined.
  7. Allow the mixture to sit in the refrigerator for about an hour to firm up.
  8. Using a large pastry bag with a large tip, or a spoon, top the graham cracker crust in each cup with the pumpkin mixture and refrigerate until ready to serve.
  9. Garnish with additional whipped topping if desired.


Although I cannot celebrate it in my classroom, I get by alright with celebrating fall. I've made some wonderful worksheets and games that have come in handy. Here I've made a Pumpkin Addition game. My students loved playing "Teacher vs. Student" and constantly asked when the next game will be.


The particular game has students adding within 100. There are easy question and some hard ones. There's also regrouping. I think you'll enjoy this game as much as my student do!

Click below for this awesome freebie!
Powerpoint Game - Pumpkin Adding within 100 - Powerpoint Game

Last, enter to win some totally awesome prizes, including my Halloween Bingo game! Don't forget to visit my store too! All my products are on sale this weekend!


https://www.facebook.com/theteaching2step
 

 Click on the next hoppers below:

LinkWithin

Related Posts Plugin for WordPress, Blogger...