Showing posts with label Websites. Show all posts

17 June 2015

Liebster Award!!!

I'm so excited! I've been nominated for the Liebster Award!. Thank you so much M&M Bilingual for the nomination! I'd never thought I'd be one to receive this award but will gladly accept it! =)


This is such a wonderful button and I'm happy to add it to my blog. I've seen it on a few other blogs and had no clue how they received it. A week or 2 ago, M&M Bilingual nominated me and learned a great deal about it. The Liebster Award is given to new bloggers. It's a great way to get support and encourage others as they blog!
 
1. Why and how long ago did you start blogging?
I started blogging way back in 2013. I was pretty new to it at the time. I wanted to share my thoughts about education as well as a little bit about my store and myself. I heard it was a great for me to connect with other educators. This definitely proves it!
 
2. What one word sums up the heart of your blog and why?
Passion! I love what I do! Even though at the moment I don't have a classroom, I love education and helping others. Before blogging and my store, I just wanted to help students, but through my blogging journey, I came to love helping  students, teachers ,and educators alike.
 
3. Is there something you learned late in your blogging journey that you wished you knew before?
How to schedule posts. I would always just write a blog post and post it that same day. About a year ago I learned how to schedule posts and now I could schedule them ahead of time! Makes blogging a bit easier.
 
4. What is your favorite pastime other than blogging?
Besides making ppt games, playing video games (Hint hint - that's where the name came from!). I come from a family of gamers. We all love playing games. From board games to card games, computer games to video games, my family can't get enough of them. My recent obsession has been Minecraft. I find myself playing it quite often, mostly for the building aspect. Who doesn't love to build stuff!?
 
5. How many hours per week do you dedicate to your blog/TPT?
If it weren't for sleeping, eating, and my niece and nephews, practically every hour. Since TPT is my full-time job, I try my hardest to put in 40 hours each week. Being self-employed has it perks. =)

6. What category of blog posts do you enjoy the most?
I love blog hops about classroom ideas. It's great to go from one teacher/blogger to the next and get wonderful ideas that I can use in the classroom.
 
7. Where does your blog inspiration come from?
My inspiration comes my own experiences in the classroom as well as my day-to-day life. My youngest nephew is starting preschool this coming year and my oldest nephew will be in kindergarten this fall. They are also my inspiration!

 8. Which post that you've written are you most proud of?
My New Year's Resolution post. I had 3 goals this year ---> Blog more, get healthy, and finish projects. I'm happy to say I am definitely blogging more. I am trying hard to get healthy. I'm exercising more and eating better. I am finishing up projects that I started so I very proud that I am sticking to those goals.

9. Is there a post that you are planning to do but have been postponing it for a while?
I have 2 that I plan on doing. One I know will be done before I go to the TPT Conference. The other is a post about using PPT Games in a new way (besides the traditional way). Pictures are the only thing keeping me for doing it.

10. What is your favorite aspect of blogging?
The writing! I love to write so it's pretty natural for me to write a blog post. I've even written and published a book, not to mention notebooks full of fantasy and realistic stories I've written since high school.

11. Which idea from a blog would you like to try yourself?
Simply a blog hop! I've join several blog hops over the years and I want to try to do a blog hop of my own. The idea I have is very original and I think many will want to try it out. I love Jessica McClain's You Ought to know Blog hop. It's one of my favorites!
 
 
Here are some blogs that I follow and would love to nominate!
 
2. Cheryl from Techie Turtle Teacher
3. Mrs. McClain from Buzzing with Mrs. McClain
4. Kelly from Glitter in Third

 
Rules of the Liebster Award:
Link back to the blog that nominated you
Answer the 11 questions posted by the nominator
Nominate 5-11 blogs (with less than 200 followers) and link to them in your post
Contact the nominees and let them know they have been nominated


21 March 2015

You Ought to know About NatGeo Young Explorer!


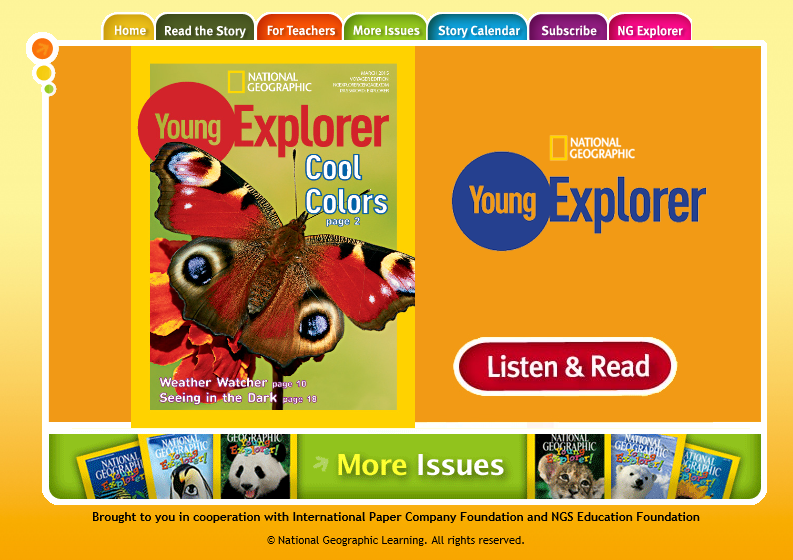
If science isn't really your forte (I know it's not mine), then you ought to know about NatGeo Young Explorer!
 
 
Finding science materials can be hard enough. Finding online sites are even harder. NatGeo Young Explorer is a great science reading site.
 
You can click on "Read the Story" and the issues can read to the students or the students can read it themselves.
 
 
There are 3 to 4 topics per issues. You can read them with your students or have them read individually. (Perfect for substitutes too!)


You can click on "Story Calender" to find out what each month's issues will include. Great for planning ahead.


You can click on "More Issues" to get more issues from previous years (all the way back to 2009).


You can click on "For Teachers" to get lesson plans and worksheets. Even interactive whiteboard lessons.
 
 
Non-subscribers can these resources each month for free (as they appear). Subscribers can get download resources from previous issues.

Be sure to check back every month for those free resources on NatGeo! Don't forget to hop on over to other bloggers for more classroom tips!
 

21 February 2015

You Ought to Know about Tumblebooks!


You Ought to Know about Tumblebooks! If there's one subject that's important, it's reading! Students need to read as much as they can so they can get better in all the other subjects. One website that I love is Tumblebooks!
 
 
Just what is Tumblebooks? Tumblebooks are ebooks of printed books. What makes tumblebooks different is the website will read them to students. It also includes information about each book, including reading level, lexile number, and even the common core standards.


Like most websites, it has a free verison and a paid verison. Most public libraries have tumblebooks for free! Some schools can pay for a subscription if they choose to.

Tumblebooks has a number of different books in different genres including fiction, non-fiction, biographies, poetry, graphic novels, and more. There's other activities as well such as games, videos, puzzles, and more.


Once you've decided on a book, you'll be taken to a Tumblepad where the story will be read to your students.


You can let the books be read to them (auto) or you can read it yourself (manually). The stories are animated which is great for your students.

 
This tool is perfect for early finishers or when students are waiting to go to the library. In my classroom, if a student finished early, they were to read, whether it was their AR book or their tumblebook. This is great for students who need more reading at home!
 
There's even unit plans for teachers to help with certain topics in the classroom. Topics include Earth Day, First Day of School, Halloween, and even grammar! Each plan comes with a guide and list of books the go along with each topics.


You can access it here:
TumbleBooks Officail Website

Here's my public library's Tumblebooks:
Onslow County Public Library
(Click on "kids">>"tumblebooks")

17 January 2015

You Ought to Know January Blog Hop


You Ought to Know about: Study Jams!


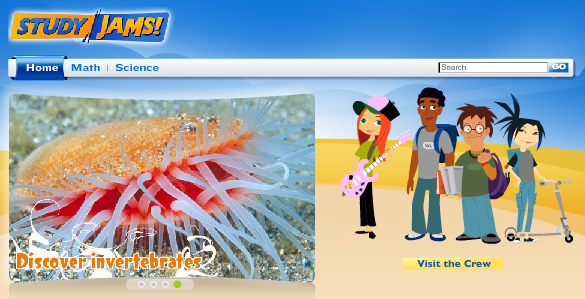
If there's one website you need to know about, it's Study Jams. This website created by Scholastic, includes videos about Math and Science topics for 2nd grade and up. I use these quite often. Not only for myself, but for my students. It's great for review!
Math Topics include Numbers, Addition & Subtraction, Multiplication & Division, Fractions, Decimals & Percents, Algebra, Geometry, Measurement, Data Analysis, Probability, and Problem Solving.  


Science topics include Plants, Animals, the Human Body, Ecosystems, Landforms, Rocks, & Minerals, Weather & Climate, Solar System, Matter, Force & Motion, Energy & Light,  and Scientific Inquiry.


Each topic includes subtopics and all you have to do is click on the topic. Some topics are videos and some are just slideshows. For the videos, "the crew" discuss real life problems for each topic.


Each topic also include key words that you can click on and see the definition. Most topics also have a "Test Yourself" which has a few questions about the topic. Some even have Karaoke songs.


For some of the math topics, there a step by step guide to solve math problems.


This website is so useful, I find myself using it almost every day, especially for the science topics. It great for the students too. Best of all, this website is free!

Check it out for yourself: Study Jams or watch a video of it in action here!
Don't forget to hop on over to other blogs for more!


13 January 2015

Blog Design Tutorial: Layout


Layout
  1. Header
  2. Posts
  3. Sidebar
  4. Bottom
  5. Background


Choosing a layout can be a easy task, but for some, it could be a bit tricky. To get started, click on "Layout" on the left side of your screen to access your blog layout.


1.) Header (Your logo!)

Create a header or someone else to make a header for your page. I made mine myself using free clip art and fonts and using "Microsoft Powerpoint" to design it. Check out my list of Clip Art from various TPTers and creators.  Once you have your header, upload it your photo website.


You can also add a ribbon (like my red ribbon) with links to various pages of your blog by clicking "Add a Gadget ". Use the gadget "HTML/JavaScript" and use a HTML code and images for your link. (Don't worry, I will go into more details here later).

2.) Posts (what you write about)

I won't go into much detail here. You can click on "Blog Post" and choose the settings that you would like to see in the blog posting area. You can choose to show 1 post at a time or many at a time. You can add the date, how it was posted (ex. say "written by" or "typed by" instead of "posted by"). You can decided about the comments and social media. You then can arrange it to your linking.


You can add other gadgets and widgets below it such as "Other Posts you Like" widget. Simply click "Add a Gadget", input the HTML/JavaScript code. You can move it by clicking on the box and moving it under the "Blog Post" box.

3.) Sidebar

Here, you can customize what viewers will see. You can add your own gadgets. Bloggers has many pre-made gadgets such as "About Me" or "Follow by Email." Some gadgets and widgets you may have to create find online or create yourself. (Again, I will go more into detail here later).


4.) Bottom
If you choose to add gadgets and widgets at the bottom of your blog, you may do so. This is also the area where you would place a "Back to the Top" button, any disclaimers, or your sponsors. I used this area for a "Back to the Top" button. 


5.) Background

This can be tricky depending on what you want. If you want a simple one design background, you can add it by clicking on "Template" on the left side of the Layout menu and click "Customize". A new screen will load. Click on "Backgrounds" and "Background Image". You can upload your own image.

 
To make the 3 different page designs, I used 3 different sets of Digi-paper and used Microsoft Powerpoint to add the shadow effect. Once each page was ready, I made a design in Microsoft Paint (Yes, paint. I was not about spend hundreds of dollars on a Photoshop program). Depending on the Layout and widths of your blog, you may have to adjust the sizes of each paper.
 
Here's a basic layout of what mine looks like:


Here's the actual background:
 

Try different designs. It will be a trial and error with the backgrounds because of the layout you choose (aka where your sidebar(s) are located).

Once you have you layout completed, SAVE YOUR TEMPLATE! I cannot emphasize this enough. If you like you design save it so that you do not have to start from scratch. I advise saving each time to changes to your blog. Sometimes codes may not work and you'll have to delete it manually (as in go into the actual HTML code and deleted it). 
 
 
Here's the link to the Blog Design Tutorial Guide.
 
 
Class Dismissed!


25 November 2014

Blog Design Tutorial: Getting Started


Blog Design Tutorial: Getting Started


Getting Started
  1. Design in mind
  2. Websites
  3. Photos, Clip Art, and Font
  4. Templates
  5. Layouts
Let's get started with your blog design. In this section, you will explore some blog designs, useful photo websites, various fonts and clip art, different templates to choose from, as well as blog layouts.


1. Design in Mind
 
Before you can even start a blog, think about the type of designs you want. If you already have a TpT store with a logo, start from there. Think about the colors you want to see. Think hard! You may not be able to change it again so easily. When I first started my logo only had my name and apple. The colors were red, green, and black. White goes with everything so I decided gray/silver would be my third color. Red and green represent the apple from my first logo. The gray/silver represents the technology where majority of my products work on.

Here are some TPTers who can create logos for you:

Maria DiCesare - $6
EduClips  - $12+
Melonheadz - Contact her for price
Surfer Kids Clip Art (Provided Free Computer Clip Art in my logo) -  $27

If you're wondering about my new logo, I made it with Microsoft Word. =P
 
 
2. Websites
 
Once you have a design in mind, there are some websites you may need to complete you own blog design. First, you will need a photo website where you can get photo links. Photobucket is the website I use. You can upload numerous pictures and create different albums. There are other website too like Flickr. You need to make sure that the website you use can create urls for your photos.
 
Another great suggestion would be to get a second blog and label it your "Test Blog" so that you don't mess up a blog you have already. Believe me when I saw I messed up my original blogs so many times, I didn't want anyone to see it. As you complete various parts, I saved the blog design and added to my original blog.

 
3. Photos, Clip Art, and Font
 
Next, you'll need to create the different sections for your website (such as headers and dividers). I used Microsoft Powerpoint and Paint to create all my designs. I used KG Fonts for my website (with a paid commercial license). There are other fonts that are available without a commercial license. Check out Fontspace or Dafonts for wonderful fonts. For clips art, mycutegraphics has free educational clip art. TeacherspayTeachers has numerous free and paid clip art. The computer clip art and banners in my header were all free from TeacherspayTeachers.

For the 2 side designs, I downloaded free Digital Paper (Digipaper)  from TPT. I will go more in depth on creating that 2 sided design latet. For now, think about what designs would like. Here are some Digipapers I tested out before I finally decided:

KristyBear Designs - Digital Paper
Red Pepper - Digital Paper
Jamie Carey - Backgrounds
Emily Wean - Digital Paper

Here are some other helpful clipart if you plan to make your own designs:

Free Push Pin Graphics / Clip Art - The 3AM Teacher
Curvy Rainbow Square Frames Clip Art - The Enlightened Elephant
Sweet Round Label Digital Clip Art - Lockless Creations

Another great website to help make your pictures have a transparent background is Lunapic.com. You can make any picture have a transparent background with only a few clicks. Simply upload a picture, choose the color you want to be transparent, and save that picture! I love it! I wonder how I lived without it.

 
4. Templates
 
As far as templates are considered, Blogger has a few templates to choose from. I used a "Simple Template" for my blog. Easy and straightforward. "Picture View" is great for emphasizing your header/logo. My advice would be to go through each one and click the type to see what you blog would look like if you chose that style.


5. Layout
 
After choosing your template, you layout comes next. This maybe one of the bigger decisions you'll make about your blog. This is how your organize the different parts of your blog including where each section goes to. You can choose your "Body" Layout (the main part of your blog) and the "Footer" layout (the bottom section of your blog). Basically, think about where you want your posts to be and where you want your other clickable sections to be.

To Choose you layout:

Template >> Customize>>Layout.

Choose your favorite layout and click "Apply to Blogger" to see what it looks like. Once you're back on the main page, you can click "Layout" and move around various parts of your blog layout.


Click For the Blog Design Tutorial Overview.

Test out a few things and see what you come up with. Let me know if you have any questions in comments below!
Class Dimissed!


18 November 2014

Blog Design Tutorial: Guide


 I promised to share with you all how I designed my blog. I will tell you upfront that you will be frustrated at some point during the process so having patience is important. If you get angry and think you can't take it anymore, throw your computer out the window.\ stop and take a break. It took me 2 weeks to complete it, only because I had to find websites with codes that actually worked. Here, I will provide you with the codes so it may take only a day or two, depending on what you want and how long you have to work on it.
 
I've broken down my blog design into different sections. It is broken down as followed:
 
  1. Guide
  2. Getting Started
    1. Design in mind
    2. Photos, Clip Art, and Font
    3. Templates
    4. Layouts
  3. Layout Parts
    1. Header
    2. Post Area
    3. Sidebars
    4. Background
    5. Bottom
  4. Post Area
    1. Post Icon
    2. Signature
    3. "Posts you may like . . "
    4. Comment Area
    5. Post Divider
  5. Sidebar Area
    1. Headers
    2. Follow Me Buttons
    3. Grab My Button
    4. Other Sections
    5. Section Dividers
  6. Backgrounds
    1. Simple Background
    2. Blog Border Color
    3. 2 Side Design Borders
  7. Bottom
    1. Bottom Blog Logo
    2. Back to the Top Button
  8. Other Tips and Tricks
    1. No Photo Shadows
    2. Pinterest Hover Button
 
As I write out the posts, I will hyperlink each section at the top so you can easily find it from this post. I will also hyperlink this post and it will also be at the bottom of every post about Blog Design. Some sections will be small. Others quite large. I will try to include as many pictures as I possibly can. You can expect a post from the tutorial at least twice a week.

I haven't decided if I want to tackle the "Page Ribbon" as it was 3 days of trial and error, but if you wish me to, I will.


Class Dismissed!


15 November 2014

You Ought to Know About Livebinder!


You ought to know about this website I found that is wonderful and perfect for any teacher in any grade or subject. Ladies and gentlemen, I present Livebinder!
 
 
Before I start, I did update my blog. I spent about 2 weeks on it and I must say I am impressed with myself! Anyway, I taught in a 1:1 school. If your unfamiliar with that term, it means that every student in every grade has their own digital device, whether it's a laptop, netbook, or tablet. I taught 2nd so we had netbooks.
 
As a teacher with students having laptops, it was kinda frustrating to have my favorite bar full of 20+ links to websites. Don't even get me started on what my favorites folder actually looked like. During a professional development that was particularly useful, they introduced this website that acts as a favorites bar except its online! Yes, that means logging in, but after that, you can access your favorite websites from ANY computer!
 
For those who continue working at home (pretty much all of us!), it's frustrating to find a website you love and then get to work and totally forget the website address because we saved it to our home computer. Livebinder is the solution!


After signing up, you can create up to 10 binders with different links to websites. For elementary teachers, that's enough for each subject and then some! Take a look 2 binders I have created. The first binder is for the content areas.


In the first tab, I've added all the reading websites I have found while I was teaching. Most of them are free (Tumblebooks, Starfall) . Others require just a log (Houghton Miffin) . One or two of them you have to pay for (Grammaropolis, Speakaboos).


Best part of all: you don't have to open a new window! With most websites, you can explore the website from within Livebinder. That means no multiple tabs. You can jump from website to website in just one binder.

You can even browse other binders that others have created.


This tool is wonderful! I look for websites at home, add them to Livebinder, and access them on my school computer. I simply keep Livebinder on my favorites bar! I hope Livebinder is as great for you as it is for me!


LinkWithin

Related Posts Plugin for WordPress, Blogger...